Google Search Console

Search Engine Optimization (SEO) isn’t always an easy task. There are a lot of ranking factors to keep track of, and many things you do on your site can inadvertently affect your results. If you want to avoid making mistakes, using Google Search Console + WordPress together can help you get more control over your SEO efforts.
Google Search Console is an excellent, free service that will help you keep tabs on your site’s SEO performance. What’s more, using it alongside WordPress is simple. In fact, we recommend that new websites set up Google Search console as quickly as possible.
What Google Search Console is (and how it benefits your site)
As the name suggests, Google Search Console is designed and maintained by Google itself. It’s free for everyone, and all you need in order to use it is a Google account and a website. While using this service isn’t required if you want your site to show up in Google results pages, it’s highly recommended.
What Google Search Console does is help you monitor your site’s SEO performance and find ways to more fully optimize it. More specifically, this service enables you to:
- Ensure Google can find and access your content in the first place.
- Submit content directly to Google, or remove specific pages from search results.
- Monitor analytics that tell you how well your content is performing in searches, and view how much traffic you’re getting as a result.
- Get alerts for any errors when Google tries to ‘crawl’ your site, so you can address those problems quickly.
- Control certain aspects of how your site displays, like whether to use www. or not.
Google Search Console can benefit just about every website owner. Some sites may need to use more of the service’s features than others, but everyone can make use of the basic tools it provides. Fortunately, it’s easy to get started with Google Search Console + WordPress.
How to use Google Search Console + WordPress (in 3 steps)
Now, it’s time to get a little more hands-on. Let’s take a look at how to set up Google Search Console, start using it, and integrate it with WordPress.
Step 1: Add your website as a new ‘property’
As we mentioned earlier, all you need to access Google Search Console is a Google account. Simply visit the website while logged in, and you’ll be given the option to add your website as a ‘property’:
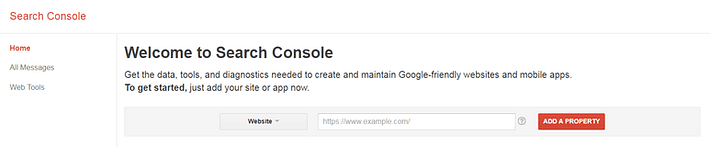
Type in your site’s main URL, and select Add a Property. Next, you’ll need to verify you actually own the website:
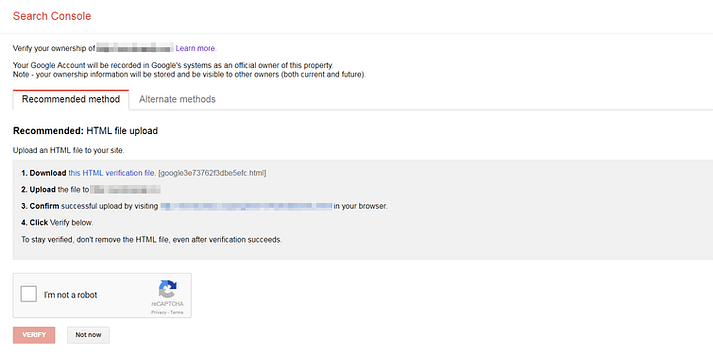
There are a number of ways to perform the verification. If you’re already using Google Analytics, the verification process is basically clicking a button.
Otherwise, the next easiest method is to upload the provided HTML file to your site, but you can check out the Alternate Methods tab for other options. Either way, hit the Verify button when you’re ready, and Google will walk you through the remainder of the process.
Once you’ve proven that you own your site, you’ll be able to start using the service right away. Your dashboard will be pretty empty right now, but over time you’ll start to find all sorts of useful information here.
Step 2: Familiarize yourself with the dashboard
Once Google Search Console is active, you’re ready to start exploring all its options. Let’s start with the main dashboard:

Here you’ll be able to see any new errors, and keep tabs on your basic search analytics results. Plus, you can manage your sitemap or add a new one. In the Search Appearance section, you can make changes to the way your content appears in search results:
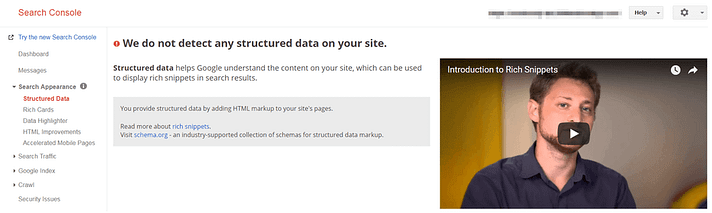
Some of the sections here – such as Structured Data and HTML Improvements – will display errors or changes you can make to improve your content’s SEO. For this reason, it’s worth checking back occasionally to look for new issues or suggestions.
Next up, we have the Search Analytics section:

Here, you can see how and where your site appears in Google’s search results, and get a lot of information about your traffic. For instance, you can view the click-through rates for specific pages. You can also track the performance of your own links and see what other sites are linking to you, through the Internal Links and Links to Your Site sections respectively.
Finally, you might also want to check out the Crawl area:
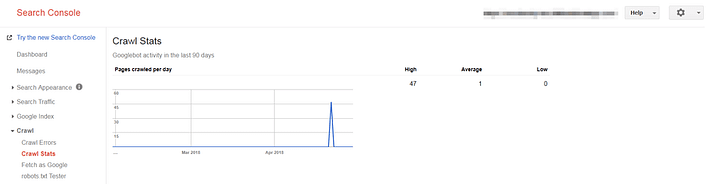
These sections report the results of Google’s attempts to crawl (or explore) your site. You can see if there have been any errors, and view the Googlebot’s overall activity. This will tell you whether Google is able to successfully find all of your content.
There are a lot of other options in the Google Search Console, some more advanced than others. If you’re ever confused about what a particular section does or what a piece of data means, there is plenty of information available in the official documentation to help you out.
Step 3: Integrate Google Search Console + WordPress using Yoast SEO
As you may have noticed, we haven’t made any mention of WordPress so far. This is because the process of adding a website to Google Search Console and using its many features works the same regardless of the platform you’re using.
However, there are ways to integrate Google Search Console + WordPress more fully. Some plugins include functionality that connects the two services. Easily the best and most relevant example of this is Yoast SEO:

If you’re not aware, Yoast SEO is a must-have plugin for just about every WordPress site. It helps you improve SEO by offering a lot of control over your content’s appearance in search results, and by showing you areas that need to be improved.
What’s more, you can connect Google Search Console to Yoast SEO. With the plugin installed, go to SEO > Search Console in your dashboard:
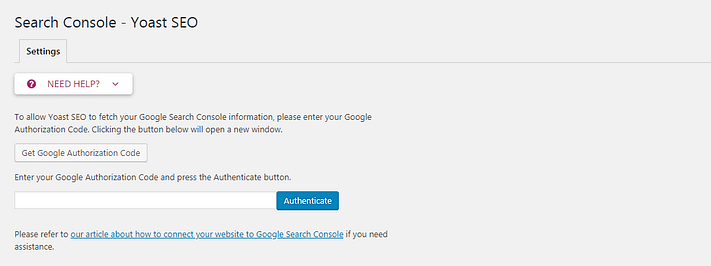
Select the Get Google Authorization Code button, and you’ll be taken to your Google Search Console account to confirm the integration. Select Allow on this page:
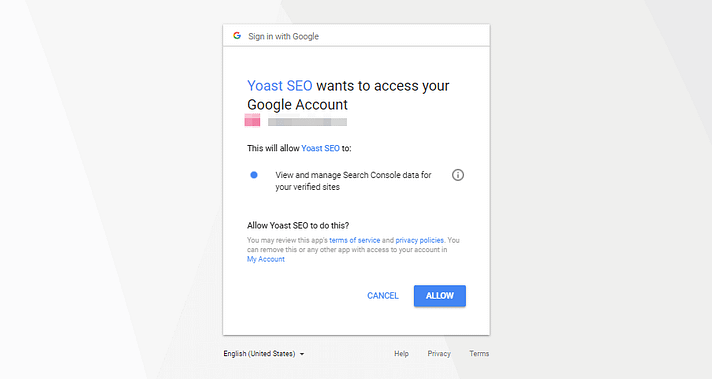
You’ll get a key, which you can paste into the corresponding field back in your dashboard. Then, select Authenticate. After, you can select the profile you want to connect to (in case you have more than one), and save it:

With that, the integration is complete! Moving forward, you can come back to this section to check for crawl errors on your site. This lets you save time, since you won’t have to visit the Google Search Console page separately.
Any errors found will be listed in the Desktop, Smartphone, and Feature phone tabs, along with information about when and why the error occurred. For more details on using this feature effectively, check out Yoast’s own article on the subject.
Conclusion
Ranking well in Google search results isn’t an exact science. It takes time and practice, as well as an understanding of some basic SEO techniques. Fortunately, Google Search Console makes your life a little easier, by letting you know how well you’re doing.
To start using Google Search Console + WordPress, you’ll simply need to:
- Add your website as a new ‘property’.
- Familiarize yourself with the dashboard.
- Integrate Google Search Console in WordPress using Yoast SEO.